The trick with having an ample supply of fresh salad leaves all summer long is successive sowing. Ie, sowing a small amount every week. Well, I’ve not had the spare time to do so! So after 4 glorious weeks of amazing salad leaves, my patch was empty! Fortunately, my neighbour came to my rescue, as he is experiencing a salad glut problem! I’m happy to help him with his problem!
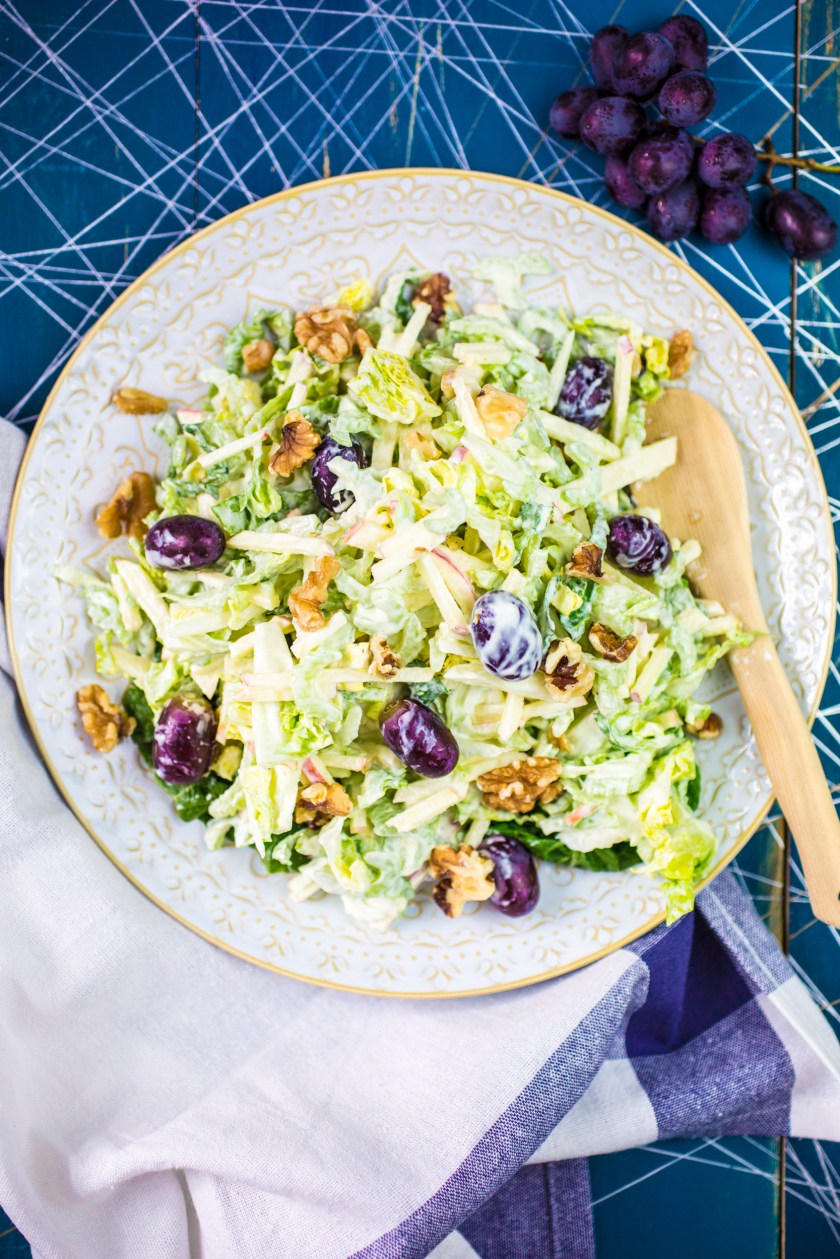
Here is a delicious vegan take on the classic Waldorf Salad. I love the fresh juicy bursts of grapes against the slightly bitter romain lettuce.
Vegan Waldorf Salad
Make a tasty Waldorf Salad vegan by using a plant based yogurt. Delicious served as part of a healthy lunch.
Serves 4
–
Prep time: 20 minutes
–
Ingredients
1 romaine lettuce 100g/3.5 oz red grapes 60g/2oz walnuts 1 apple 2 celery sticks
For the dressing:
130g unsweetened plant based yogurt 2 tbsp tahini 1 tbsp lemon juice 1 tsp english mustard a small bunch of tarragon, chopped a pinch of salt ground black pepper
Method:
Finely chop all the salad ingredients and place them in a large bowl. Set aside.
Next make the dressing by mixing all the dressing ingredients in a bowl until well combined.
Pour the dressing into the salad, mix well and serve immediately.
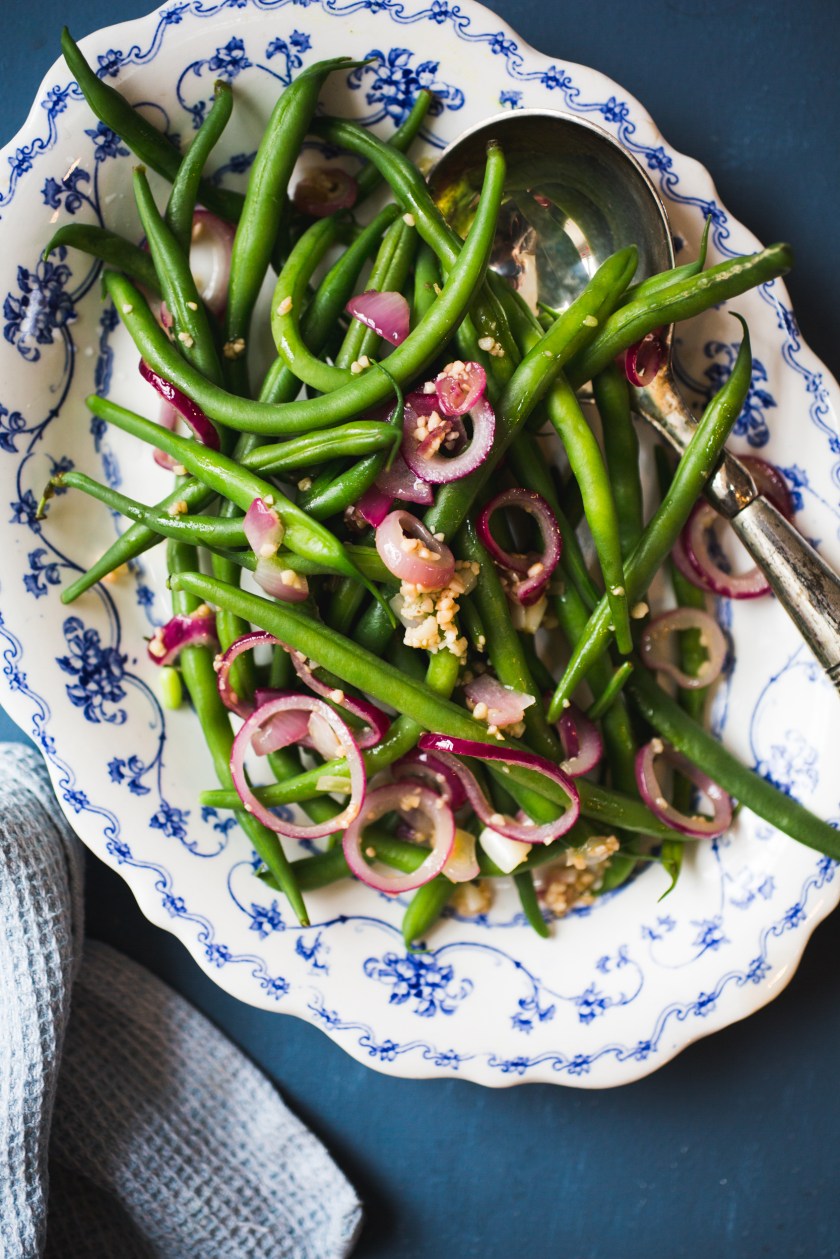
Some vegetables are best served simply, like green ( French ) beans done in plenty of garlic and just a little lemon juice. In my family ( my mum’s side anyhow) we’ve always cooked our vegetables at a minimum – so it wasn’t until I learnt through my Italian hero ( now sadly passed away) Antonio Carluccio that a good green bean should be cooked for a whole 15 minutes! Once I started doing that, I must say my bean dishes greatly improved. However, this is only the case with shop-bought beans I find, for beans picked fresh in the garden, like the ones above they just need about 7 minutes to become tender but still keep a little “bite”.
The variety, should you be interested in knowing, is called “Speedy Bean” and I’m growing them on the recommendation of my utterly talented gardening cousin and her gifted Master Gardener boyfriend, who reckoned they would be a suitable bean for the challenging Scottish climate. And they are right!
So, to the recipe! It’s simple, it’s delicious and it good on its own for lunch, or as a side for dinner.
Green ( French) Beans with Garlic and Red Onions
Serves 4
Prep time: 10 minutes
Cooking time: 10 minutes
450g/1 lb freshly picked french beans, washed
3 tablespoons olive oil
1 small red onion, finely cut into rings
3 gloves garlic. minced
sea salt and black pepper, to taste
1/2 lemon, juiced
1 Bring a large pan of water to a boil. Add the beans and cover the pot. Cook the beans, covered, for 3 to 5 minutes until tender but still firm. Drain and rinse under cold water.
2 When you are ready to serve, heat the olive oil in a frying pan, add the red onion and garlic and sauté for about 1 minute, until the red onion goes glossy.
3 Add the beans, salt and pepper, and sauté briefly. Squeeze over the lemon juice and serve.
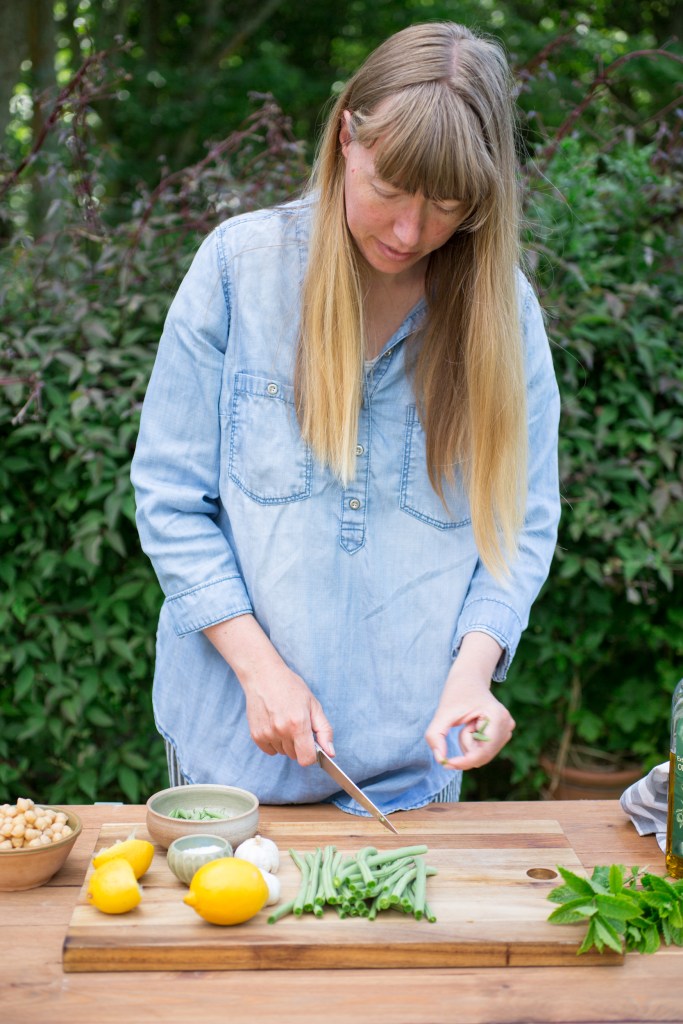
Welcome back to Camera & Clementine! Or perhaps, please welcome me back?! I’ve taken some time away from the blog (ehem.. a few years! How did that happen!?) to focus on motherhood and my two pregnancies, and now two children!
I’ve not been absent from the “real” world of food however, I have now been contributing recipes and food styling to Kitchen Garden Magazine (amongst others) for 7 years! (Again- how did that happen?!) And I’ve also published a cookbook together with master gardener Steve Ott, called Let’s Grow and Cook, where we show you how to do just that – cook the food you grow on your allotmet. Get your copy here.
But why the absence from the blog? Well, something just had to give. As if being a mum to young children isn’t enough to have me flat out, I’ve also been building up an art retreat business together with my artist mum, called The Creative Olive. We host our retreats all over Europe, mainly in Portugal, Spain, Denmark and Scotland. My mum is in charge of the inspirational teachings, and I cater for the wonderful guests, cooking organic and vegetarian delights, all week long. I’ll write more on that another time, but in the meantime do check out our art retreats and courses here!
Juggling work with running a business and a household/garden and animals with all that entails, keeps me on my toes!
This leads me nicely on to self care. Self care as a parent is vitally important. It won’t look like the pampering you knew before parenthood. But doing something for yourself is vital for survival as a parent i think. Whatever that may be, finding a small window of opportunity for that to happen will keep you happy.
For me, practicing a simple sun salutation either in the morning or evening centres me and allows me to focus on what really matters in that moment. Also practicing gratitude, either through journaling or simply stating it out loud has had a profound effect on me. Gardening, photography and cooking are still highlights of my everyday, even if they are not taking the leading role – thats ok!
So, to ease myself back into the world of blogging – I’m sharing with you my recipe for Turmeric Milk.
The key ingredient in golden milk or turmeric milk is of course turmeric, with its active component, curcumin.
Turmeric, has been used in Ayurveda for centuries due to its healing properties as well as its antioxidant properties.
Antioxidants are compounds that fight cell damage, protecting your body from oxidative stress. They’re essential to the functioning of your cells, and studies regularly show that diets rich in antioxidants help lower your risk of infections.
Turmeric is also known for:
Reducing inflammation
Improving brain function and memory
Boosts mood and reduces depression
Has anti-fungal and anti-viral properties
I started drinking a cup of turmeric milk during my postpartum/postnatal period and it had a hugely positive effect on me. And I’m certain it aided to my speedy recovery after labour, as well as keeping the baby blues away. I have since then made it a few times week, especially at times when I feel I need a de-stresser.
To make it easy to prepare, I make up a batch of about 10-15 servings of spice mix. Then all I need to do is add hot milk and a spoonful of ghee/coconut oil.
2cups milk or plant-based milk 1 tsp ghee or coconut oil 2 tsp coconut sugar/agave or honey 2-3 tsp heaped spice mix
Method
Add all of the spices to a jar and shake vigorously until well mixed.
To make the turmeric milk, add 2-3 tsp of the pre-made spice mix to a small pot, with the 2 cups of milk and ghee/coconut oil. Whisk very well and turn the heat to medium. ( you may like it stronger, just add more spices then)
Let the milk reach almost boiling point, then stir continuously for 3-4 minutes until well heated through. Do not let it come to a full boil. The milk will look brown in the beginning but after the spices heat up, it will turn to a vibrant golden colour.
Sweeten with your choice of sweetener. Pour in mugs and serve immediately.
Some sediment (spices) will settle at the bottom of your mug, just stir it a couple of times while drinking. The spice mix will keep for 6 months in its jar out of direct sunlight. But it is more beneficial to use fresher spices if possible.
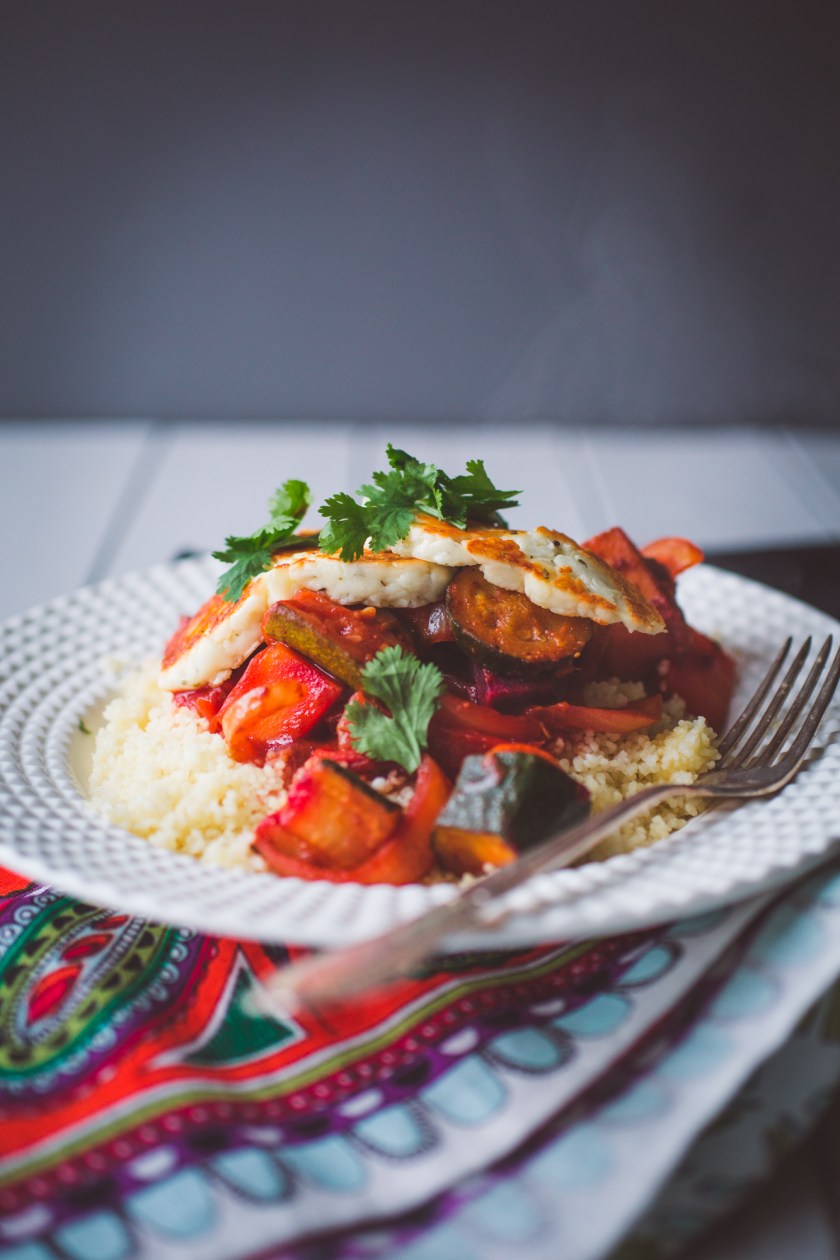
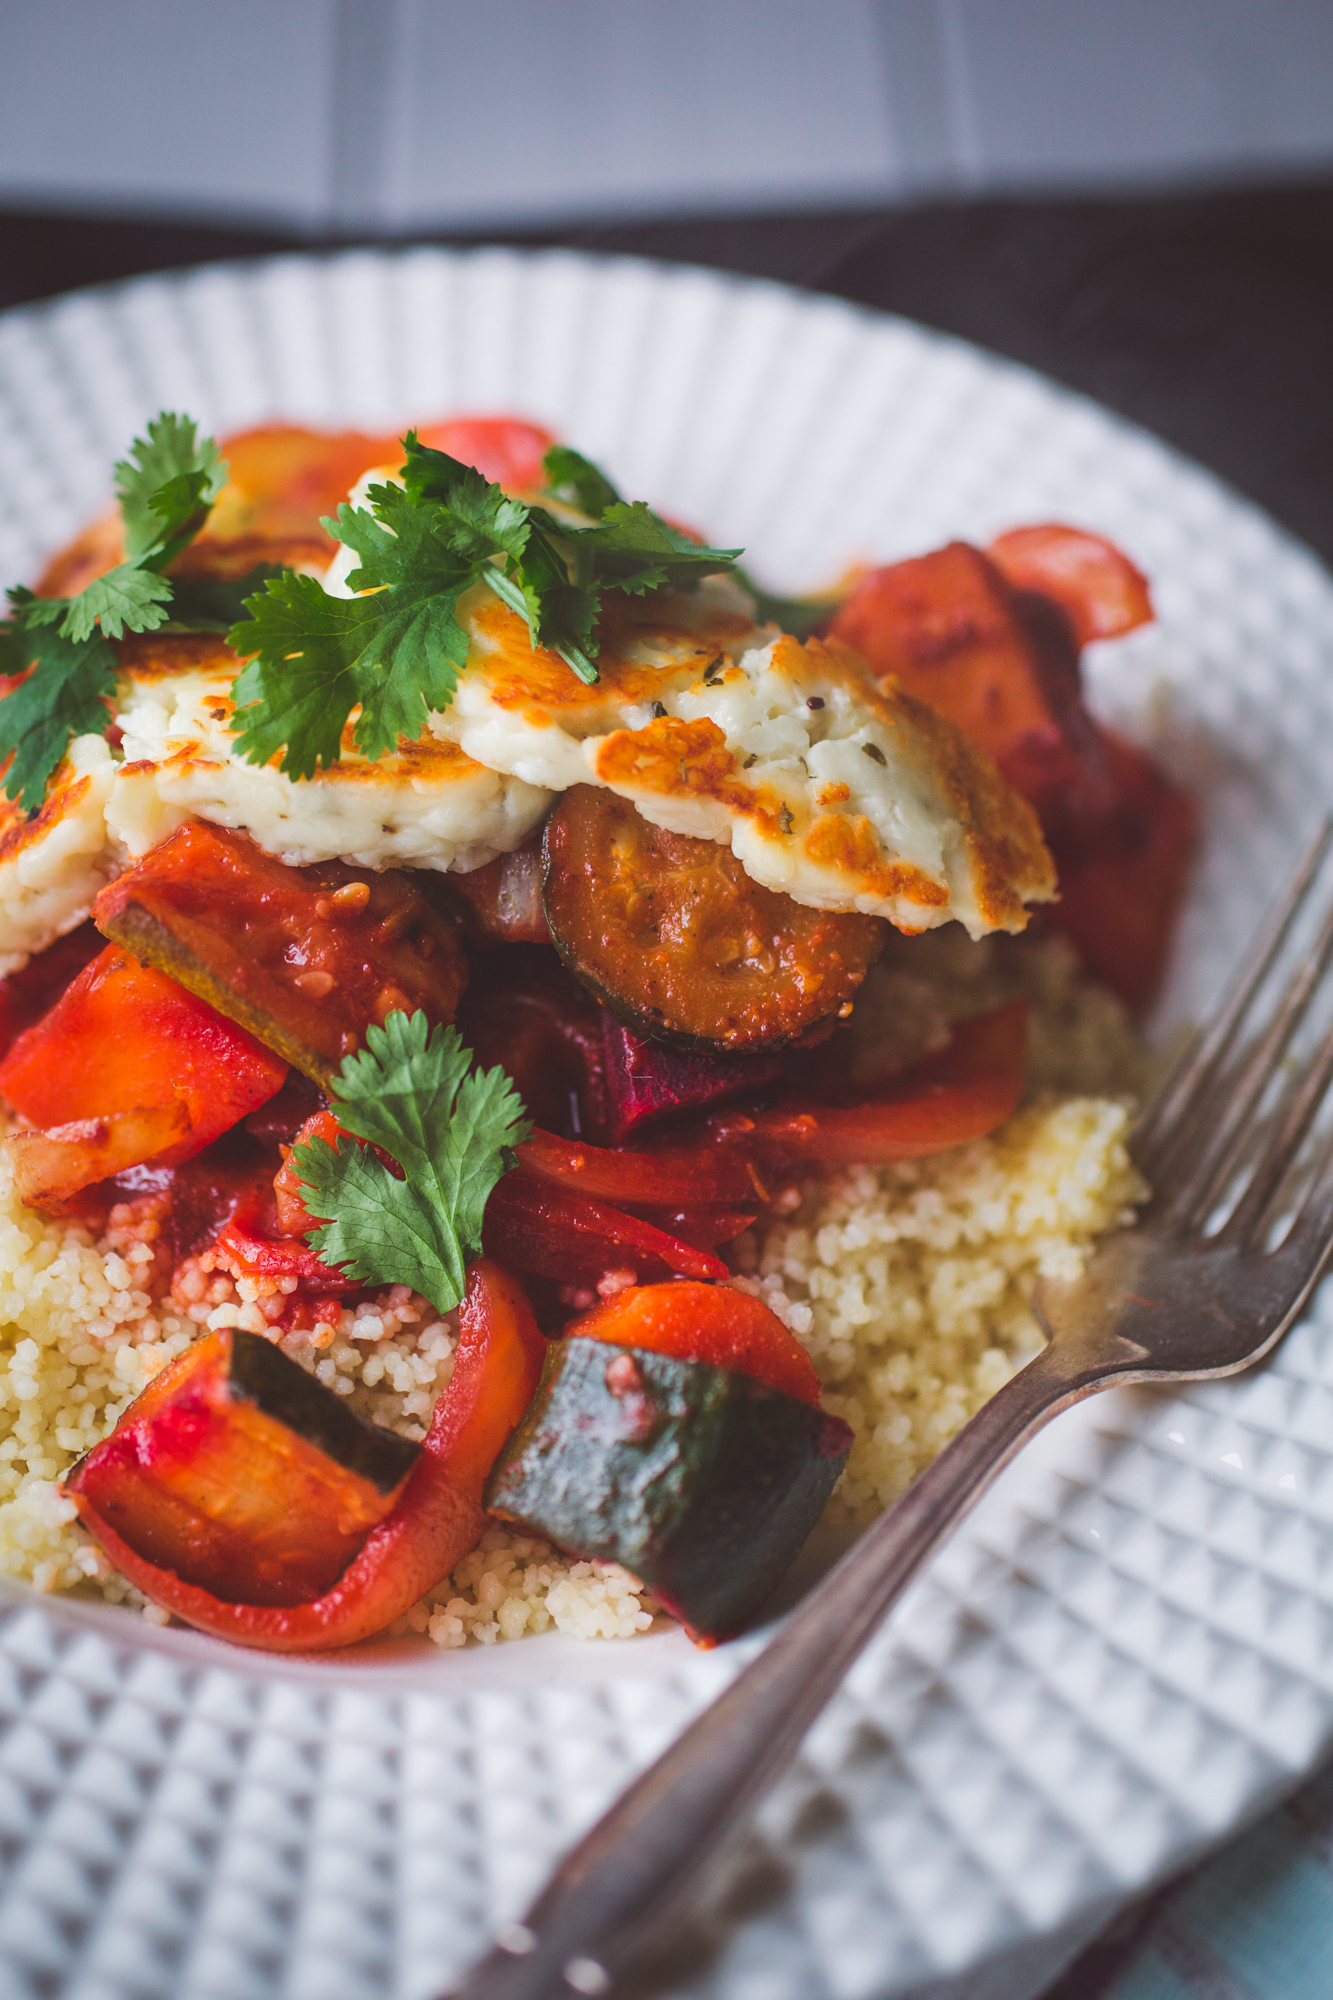
Although tagines hail from the warm climate of Morocco, I find them perfect for the winter time, with their deep flavours and comforting aromas. Vegetable tagines are also really easy to cook, as there is very little hands on time, when you prepare them in the oven in a lidded dish. And fluffy couscous is also the quickest carb to prepare, ever!
This is a beautifully fragrant and delicious dish, full of vegetables and aromatic spices, sure to warm you up and uplift your senses!
Serves 4
2 courgettes, roughly chopped 1 large beetroot, peeled and diced 1 large onion, roughly sliced 2 gloves garlic, minced ¼ butternut squash, peeled and diced 1 carrot, chopped 12 cherry tomatoes, sliced
5-6 dried apricots, halved 1 ½ tbsp tomato puree 2 tsp smoked paprika 1 tsp cumin 1 tsp curry powder 1 tsp salt 1 tsp pepper a large bunch of coriander 500ml vegetable stock 250g/9oz couscous 1 pack halloumi
extra virgin olive oil for the couscous and for drizzling
Preheat oven to 190°C/ 170°C fan/ gas mark 5.
Place all the ingredients into a casserole dish with a lid. Stir to combine.
Bake for 40-45 minutes until the vegetables are tender and fragrant, but still hold their shape.
Meanwhile make the couscous by pouring it into a large pan or bowl. Drizzle over a tbsp of good olive oil, and season with salt and pepper. Now pour enough boiling water over the grains, to just cover it, and no more. Pop a lid over the couscous, and let sit for 15 minutes. Once it’s ready, fluff it up with a fork.
Whilst the tagine cooks, heat a non-stick frying pan or griddle pan. Cut the halloumi into 6-8 slices and fry on each side for 2 mins until golden brown, and slightly crispy on the edges.
Serve the vegetables on top of the couscous, topped with the halloumi and extra coriander. Drizzle with a little extra virgin olive oil. Enjoy!
Happy New Year! With a new baby in the household, we didn’t stay up for the bells last night. However we were beautifully rewarded with plenty of energy this morning, as we awoke to perfect blue skies and winter sunshine.
I don’t feel like I sinned very much over the festive period, hardly a drop to drink, and only a few Christmas treats passed my lips. I just don’t have the time to pig out with a new baby! I didn’t even manage to do any holiday baking, like I usually do – such as this yummy Christmas Spiced Beer Cake. But I did succeed in hosting Christmas dinner for 9 (crazy crazy with a new baba!)…but my new 8 ring cooker came in very handy! Bring on industrial sized cooking equipment, yeah!
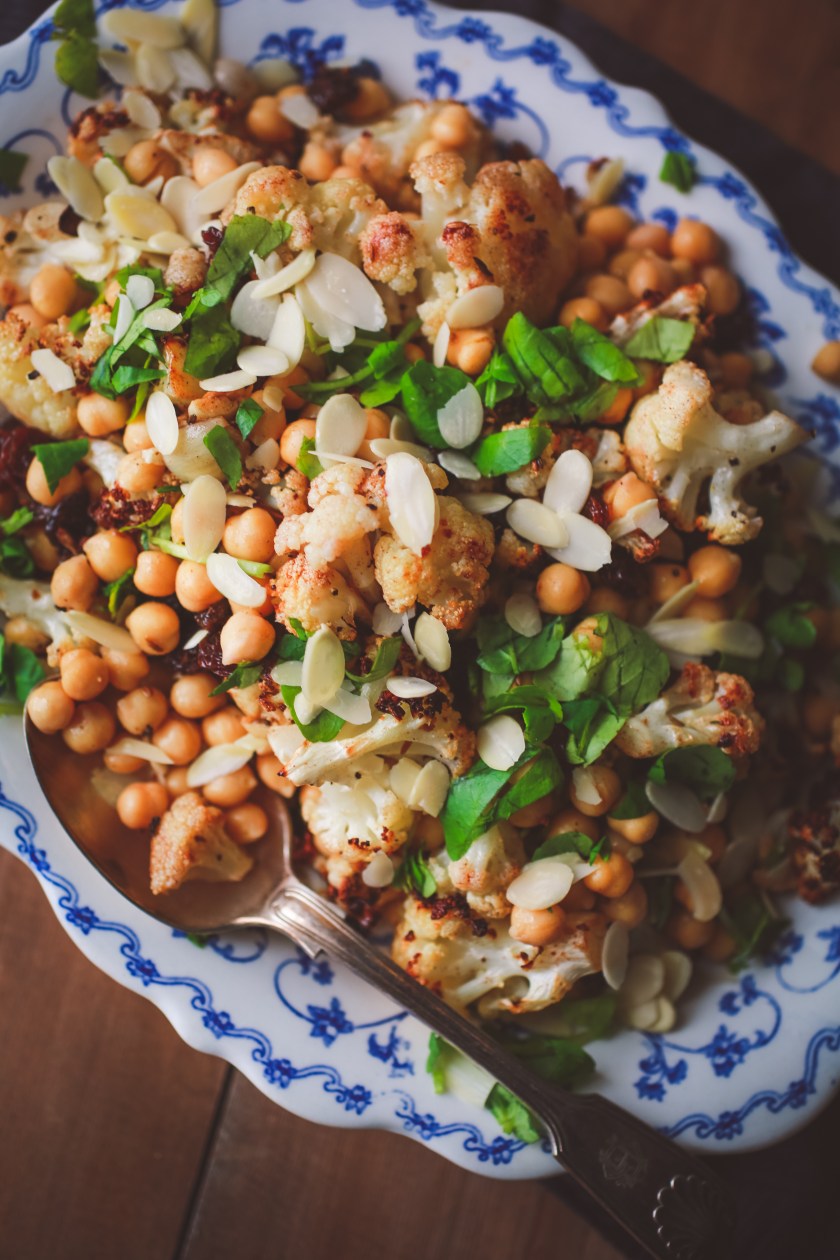
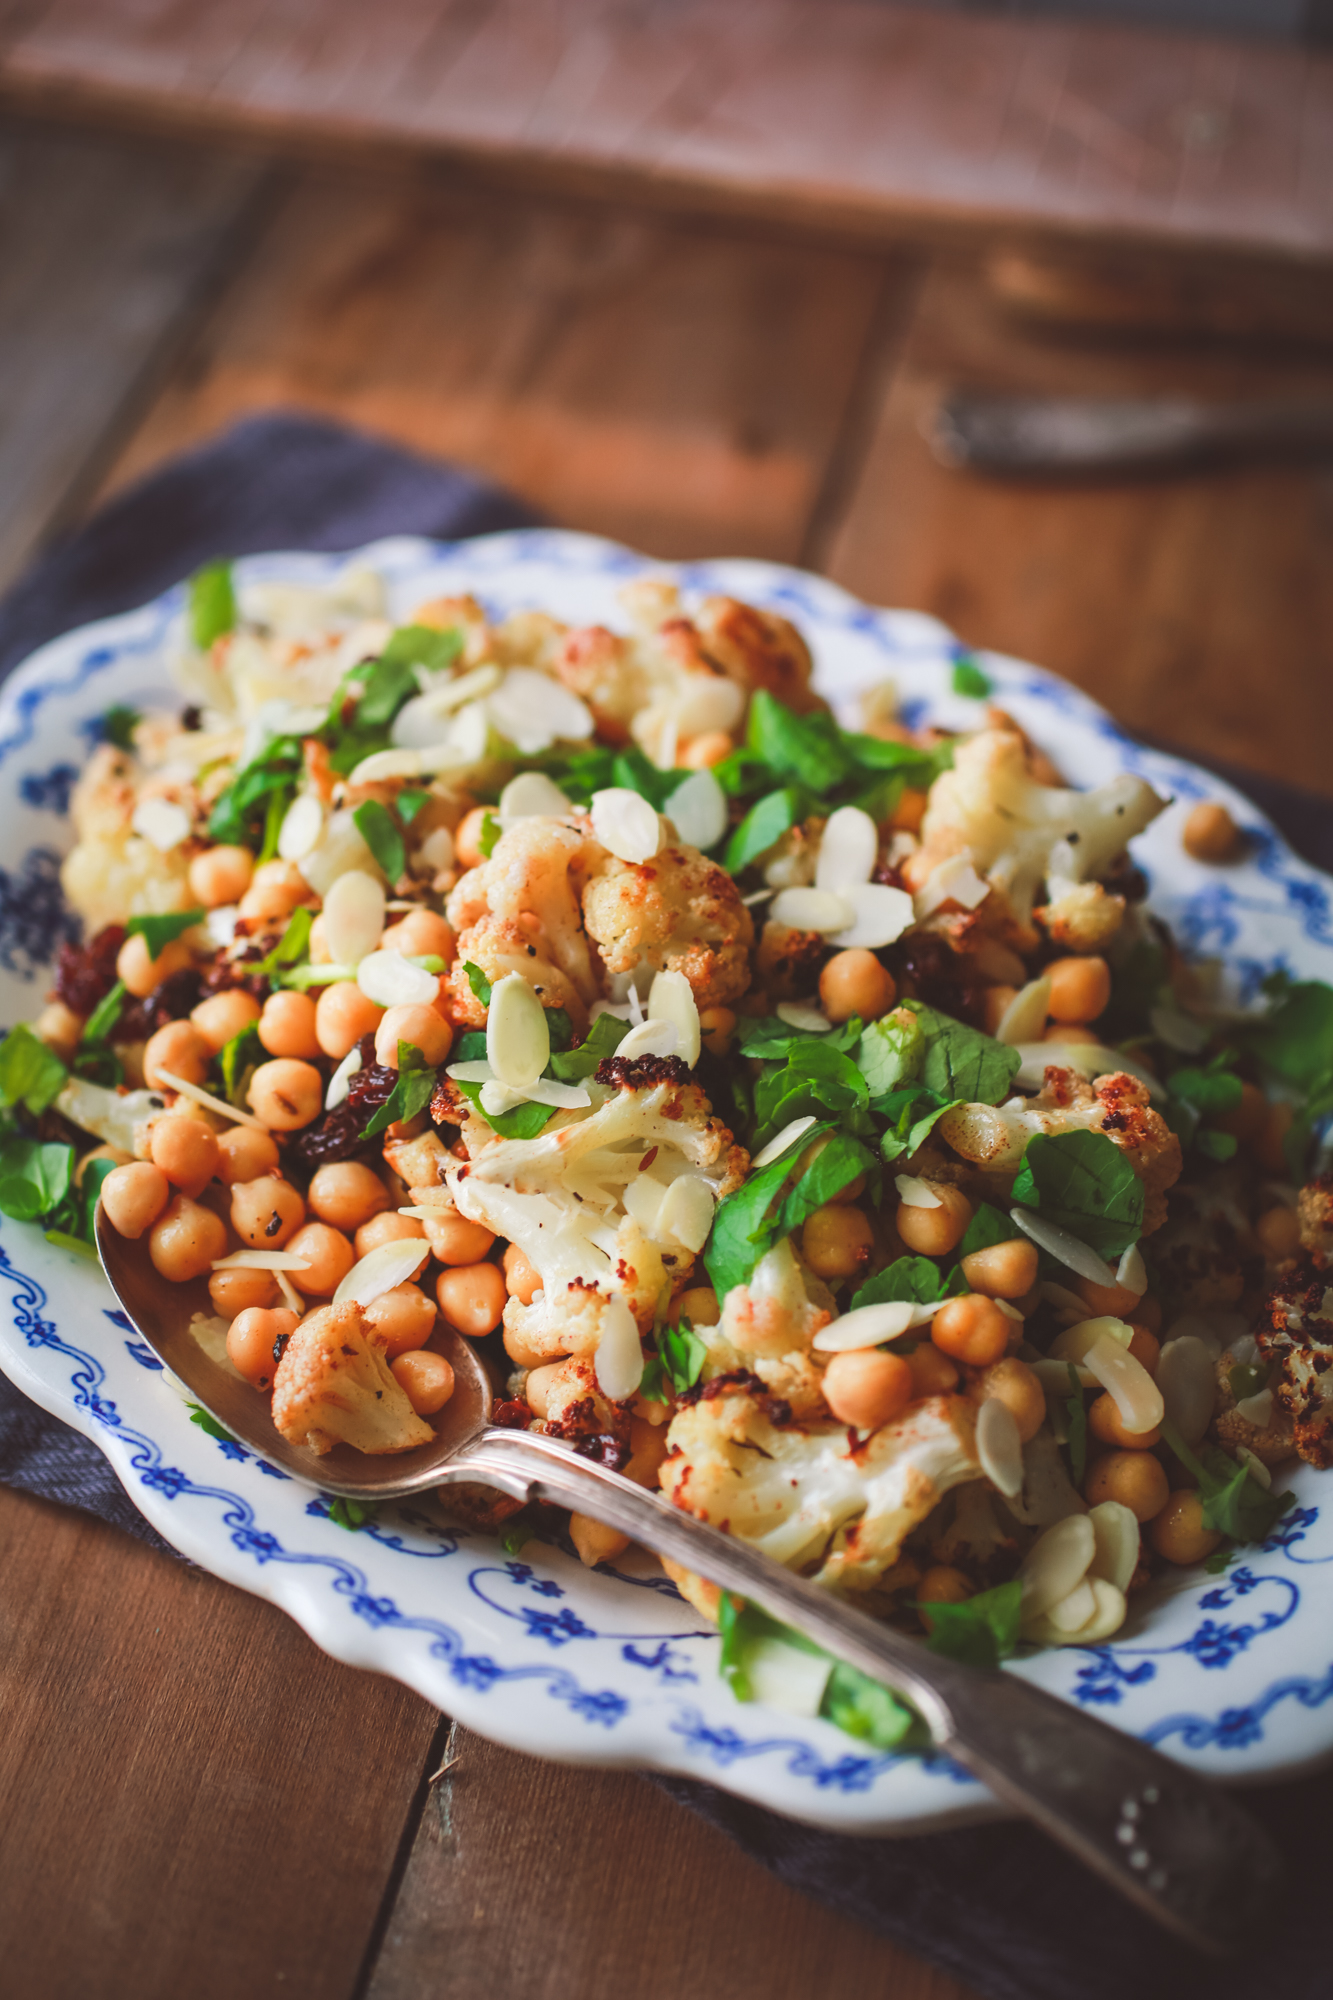
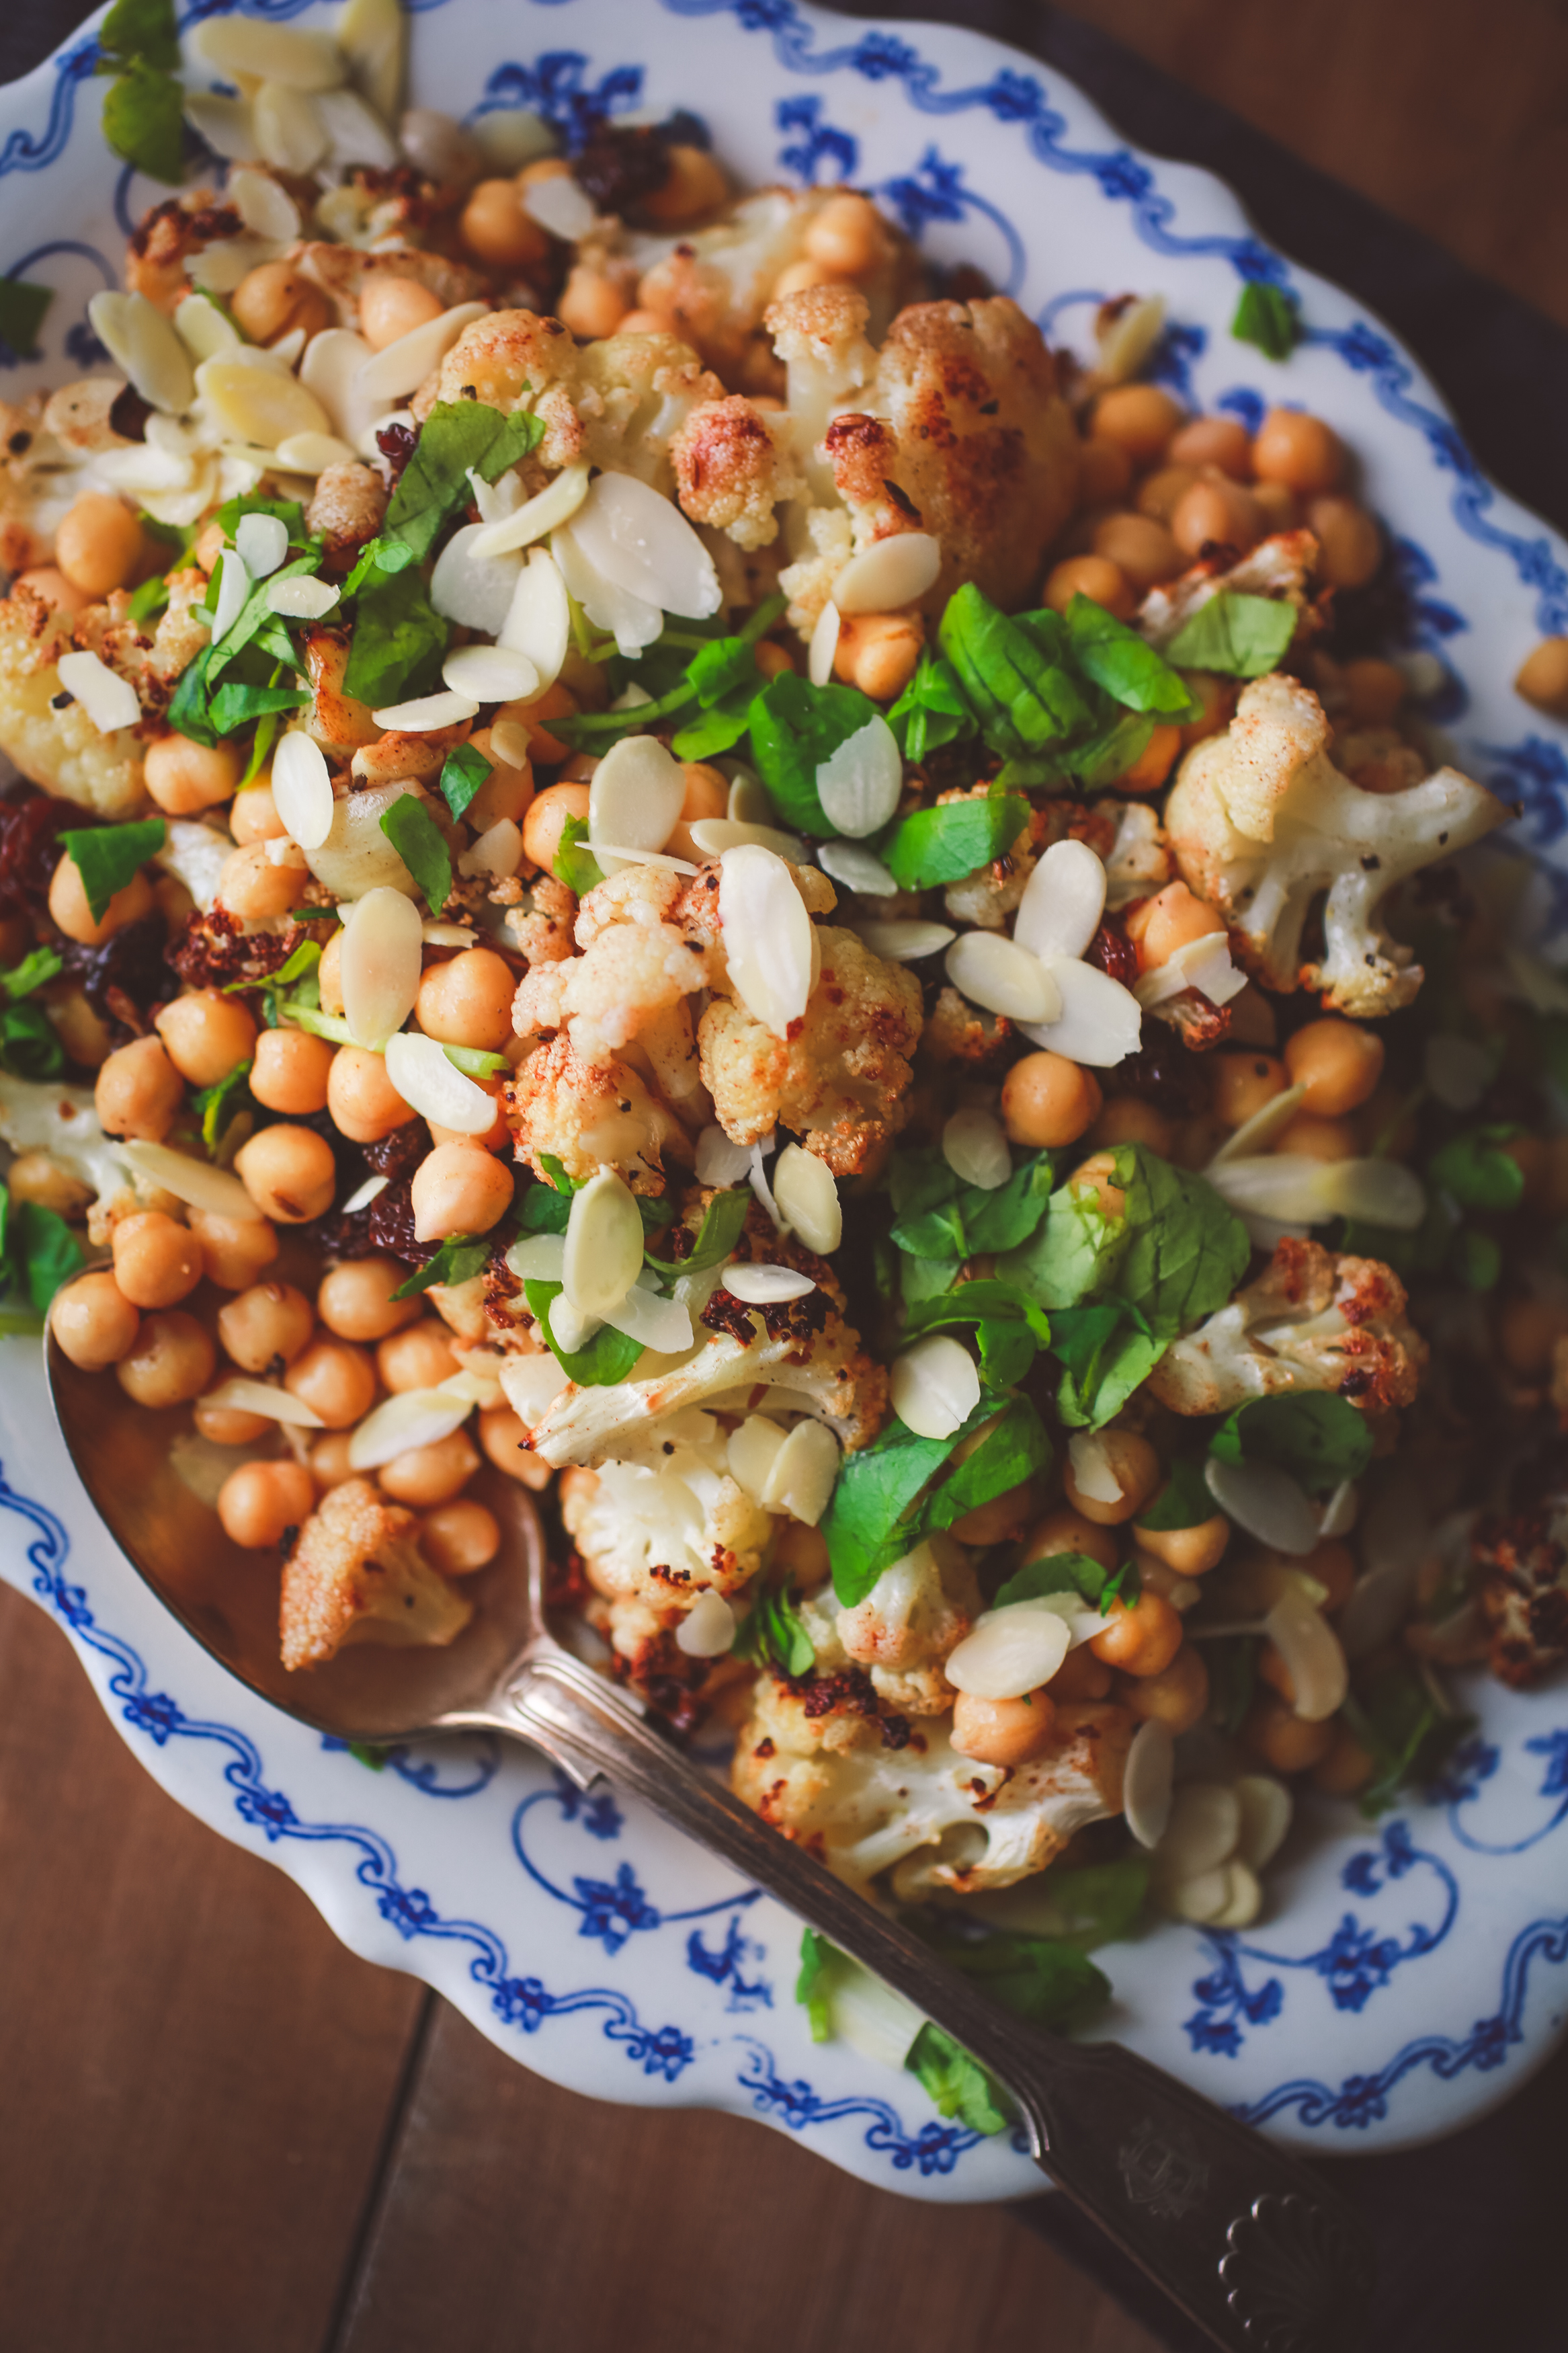
But, never the less, I thought I’d share a delicious and healthy vegan recipe for Sicilian Cauliflower Salad, which is easy to make, after you’ve just had enough of cooking…
Salads aren’t just for summer, you can get very creative experimenting with your winter veg too. This warm fragrant salad of cauliflower takes its inspiration from Sicily, and is lovely served for lunch or as a side dish.
1 medium cauliflower
1 tin chickpeas, drained 2 tbsp extra-virgin olive oil, plus extra for roasting and frying 25g/1oz golden raisins 1 small onion, finely sliced 2 garlic cloves, finely sliced 1/2 tsp smoked paprika 1 tbsp capers, rinsed 30g/1oz flaked almonds 1 tbsp roughly chopped flat-leaf parsley 1/2 lemon, juice of or 2 tbsp white balsamic vinegar
Preheat the oven to 200°C/400°F/gas mark 6.
Remove all the leaves from the cauliflower and cut out some of the core (this will cut down on the cooking time)
Put into a small roasting-tin and brush the cauliflower with a little olive oil. Add just enough water to surround the very base of the cauliflower. Roast for 1 hour – 1 hour and 20 minutes, or until tender.
Meanwhile, cover the raisins with boiling water in a small bowl. Leave to soak until the cauliflower is roasted. Then drain, and add to a bowl together with the capers, parsley, lemon juice or balsamic and 2 tbsp of olive oil. Mix well.
Cook the onions and chickpeas in a little oil over a medium heat until golden, then add the garlic and paprika and cook for two minutes over a gentle heat.
When the cauliflower is cooked, remove from the oven and gently break it into florets, add it to the bowl with the oil and raisins, mix well to coat.
Transfer the cauliflower to a serving dish, and layer on the onion mixture and top with almonds.
Når min mand skal forkæle mig, så laver han gerne en portion Amerikanske Pandekager. Det kan han fordi de er meget nemme at lave, og fordi jeg har lært ham hvordan! Vi guffer gerne en portion om søndagen, hvor vi serverer dem med smør og ahornsirup. Men jeg har været ivrig efter at afprøve Utekrams Blåbærsirup til denne opskrift, og jeg kan sige jer det er lækkert.
Nyd de små tykke amerikanske pandekager til brunch eller server dem som dessert.
Pisk mel, bagepulver, smeltet smør, salt, sukker og kærnemælk sammen. Pisk æggene for sig, og tilsæt dem tilsidst.
Vend blåbærene i dejen.
Hæld en lille smule dej ud på en varm pande og steg pandekagerne gyldne på begge sider i lidt smør. Vær tålmodig før du vender pandekagerne, så de har tid til at hæve.
Hold pandekagerne varme i ovnen mens du steger resten.
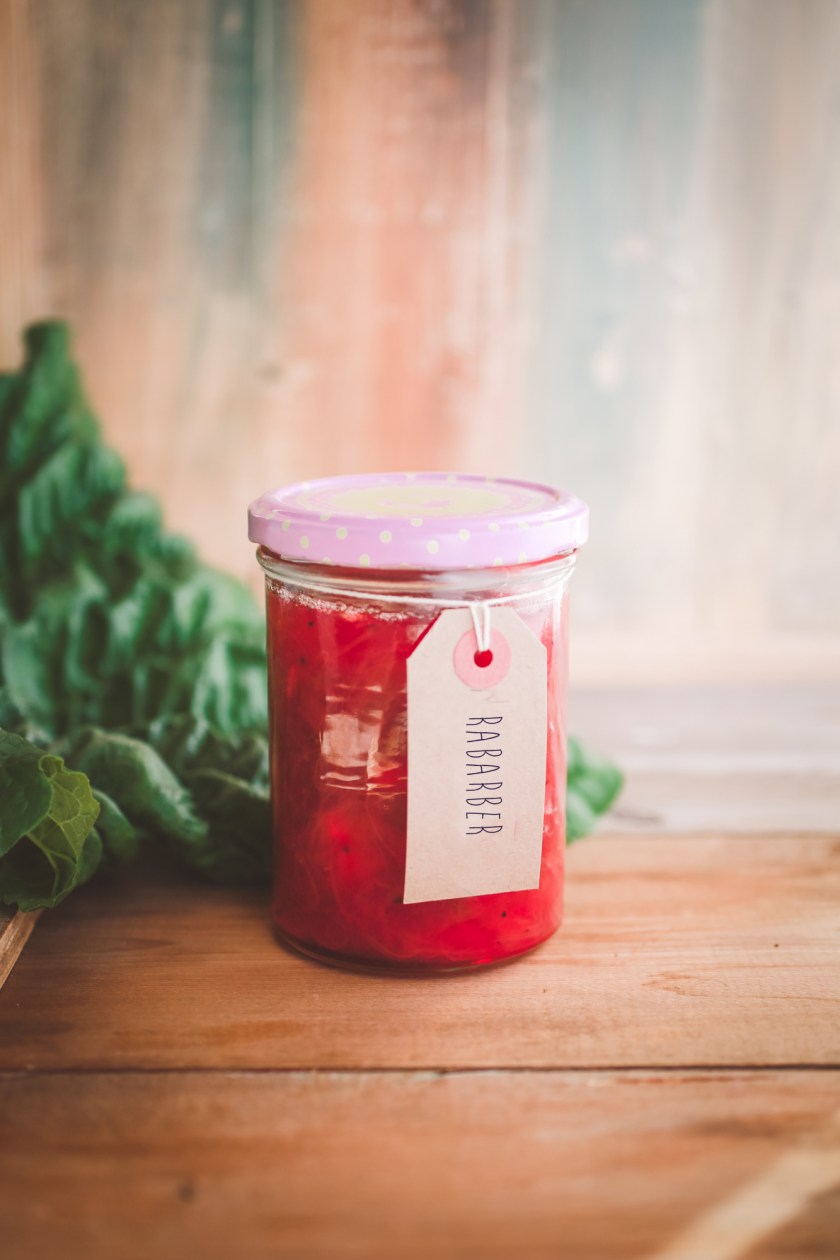
I have just started to blog for Danish health food producers Urtekram. They make high quality organic food and beauty products, which are for sale in Denmark as well as here in the UK. If you can read danish (!) then I’ll be blogging from here a couple of times a month. I’ll be highlighting some of their fantastic products in my recipes, which I’m sure will tempt you – such as Low-Fat Organic Cocoa and Organic Coconut Sugar.
Let me share my fist blog post from Urtekram here with you, in English!
Delicious and sweet homemade rhubarb jam, made with my own freshly picked rhubarb.
Put a small plate in the freezer. Put the rhubarb into a large saucepan and heat until the rhubarb begins to go soft.
Next add the sugar and halved vanilla pods. Continue to heat gently, stirring, until all the sugar has dissolved, then squeeze in the lemon juice and increase the heat.
Boil for about 10 mins, skimming off the scum as you go.
Test for setting point by spooning a little onto your chilled plate. After 1-2 mins, push your finger through the jam – if the surface wrinkles it is ready, if not, keep cooking for 2-min intervals, testing in between. (alternatively use a sugar thermometer, and let the jam reach 105C)
Once the jam is ready, let it cool for about 15 mins before ladling into warm sterilised jars and sealing. Will keep for 6 months in a cool, dark place.
As a vegetarian, I eat a very varied diet. Not only is that a good thing, ensuring I get all the nutrients needed, but it also makes me happy. I couldn’t eat the same thing every day. But having a few preserves on hand to brighten up a sandwich, pop into a tart recipe, or add to other dishes, really does make a lot of difference in the flavour department.
As I work from home most of the time, that means I eat from home most of the time. So I like to have a fridge full of ingredients that I can whip up fast into something tasty for lunch, without having to drive into town to pick things up.
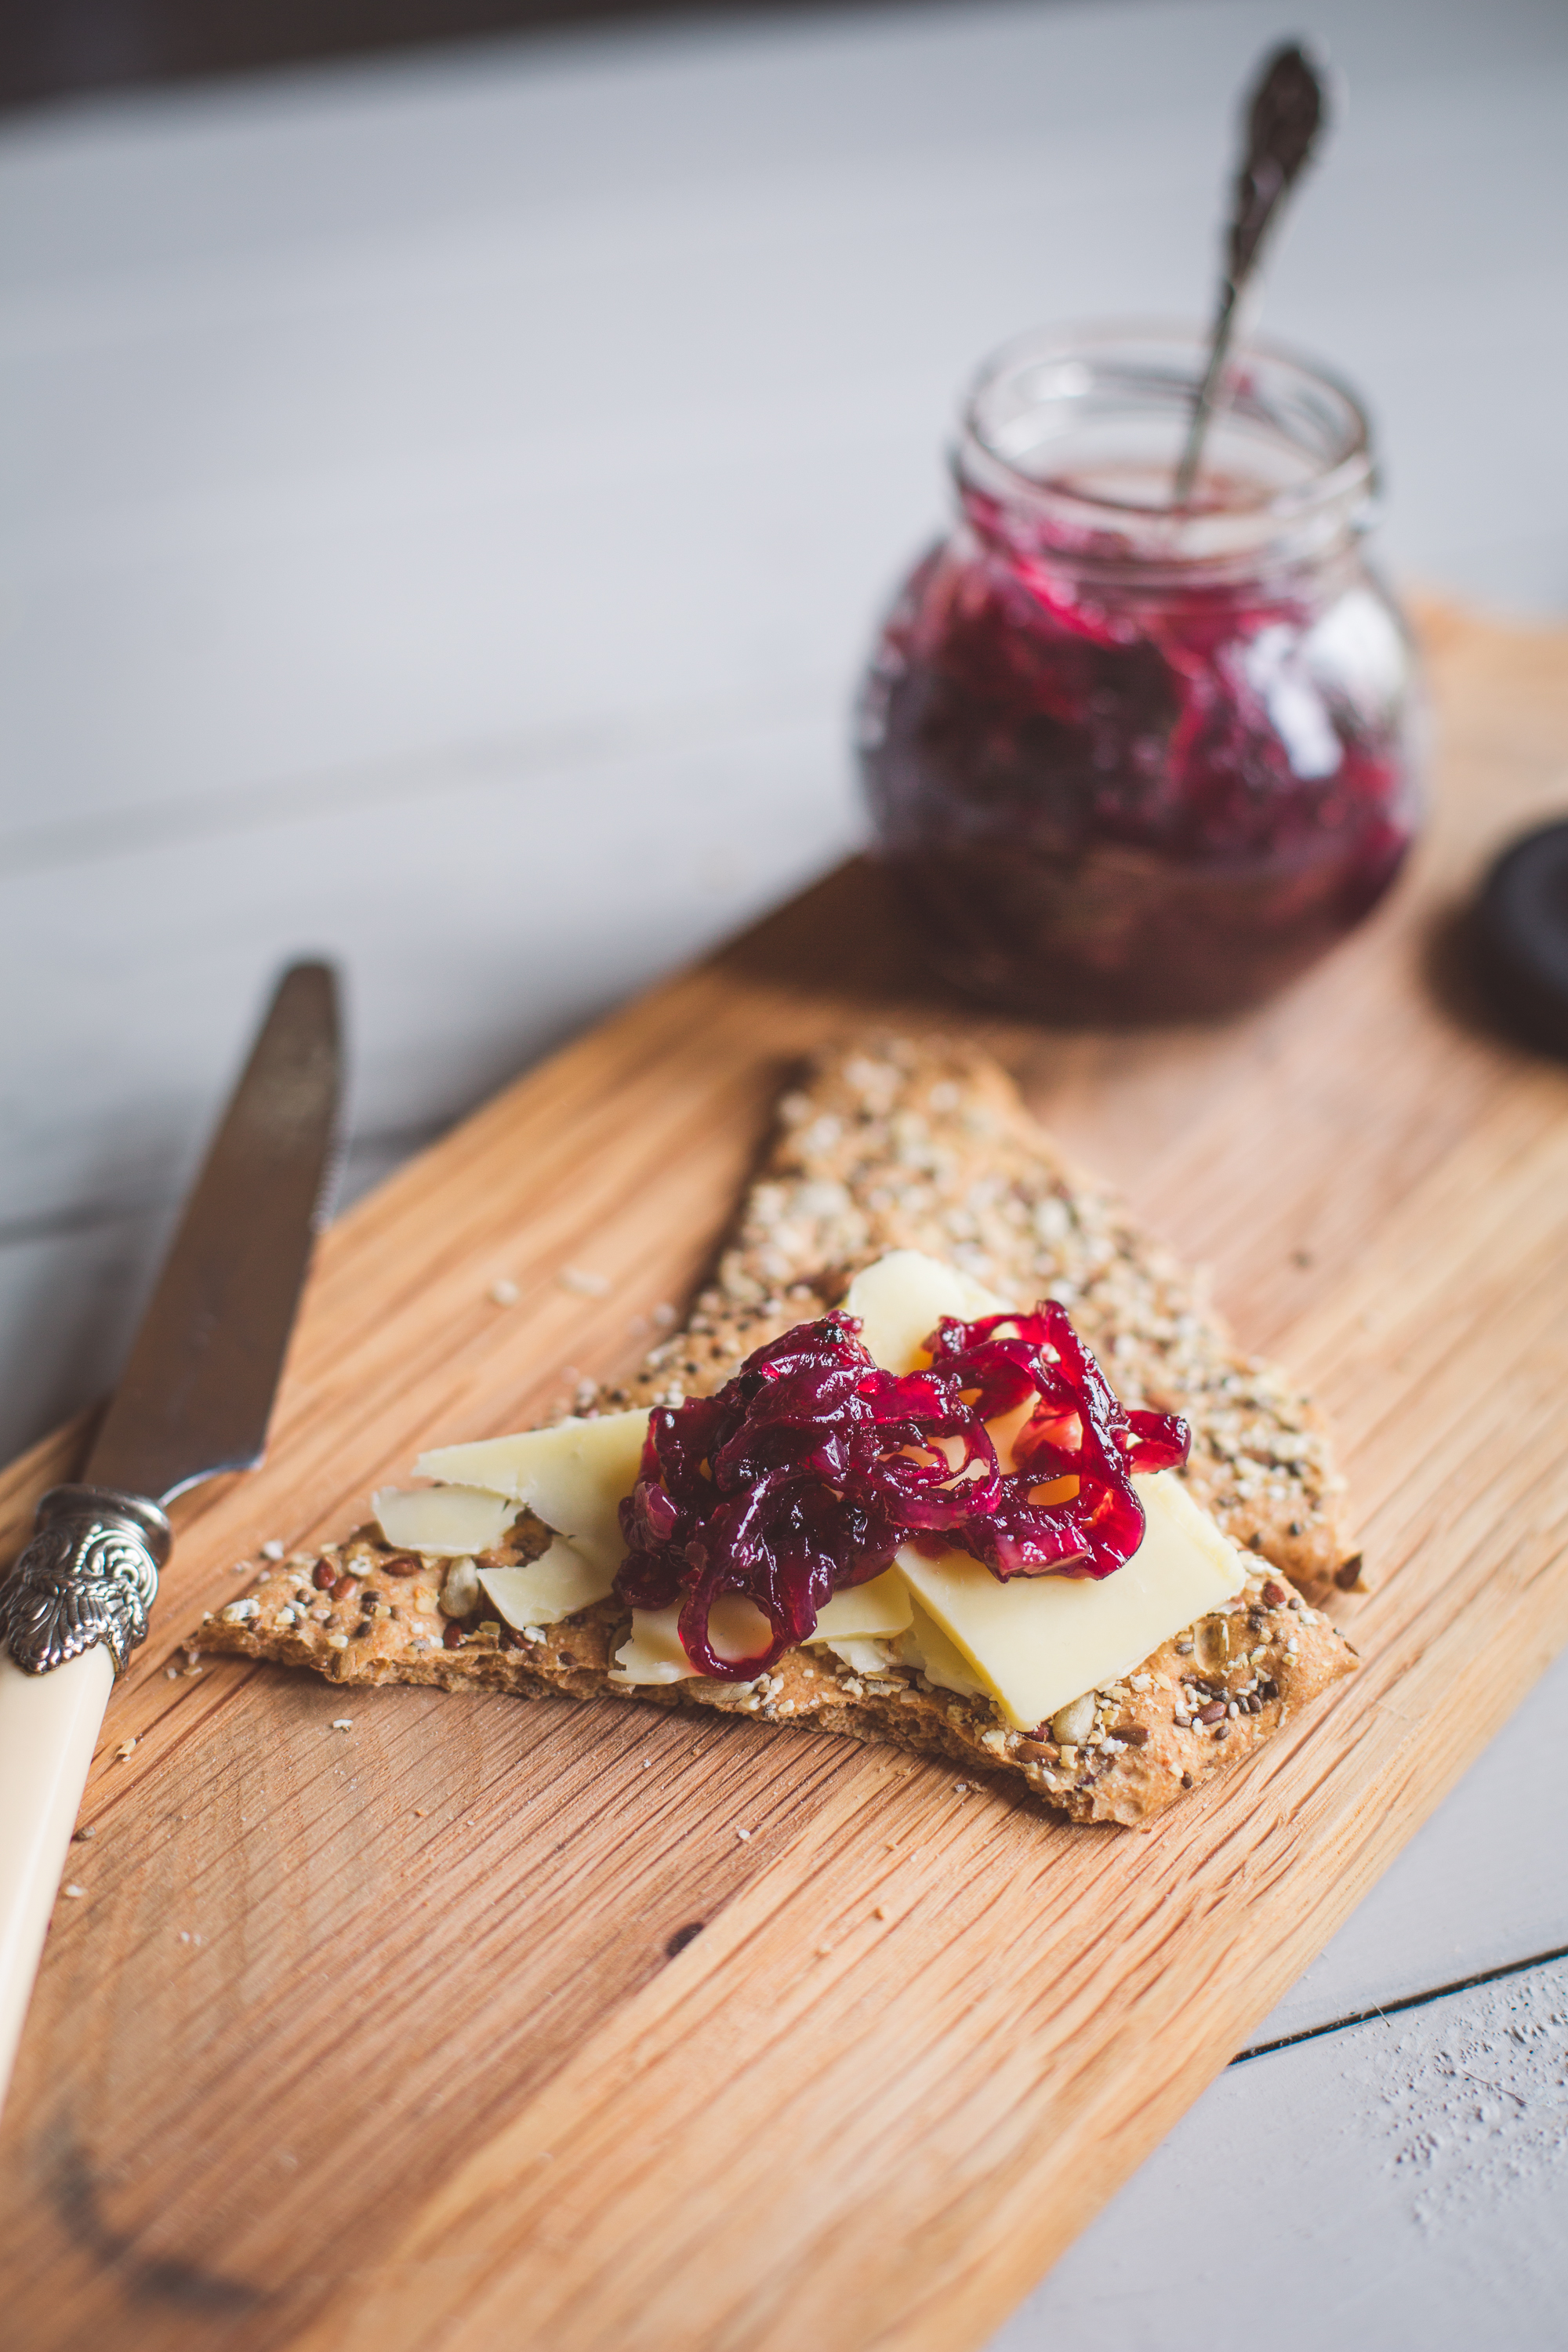
This Red Onion Marmalade is up there with the best preserves I’ve made, sweet sticky and perfect with a ploughman’s lunch, a slice of quiche or topped on crisp bread.
Red Onion Marmalade
Makes 4-5 x 370g jars
2kg red onions 4 garlic cloves, minced 150g butter 160g golden caster sugar 1 tbsp fresh thyme leaf 375ml red wine 450ml red wine vinegar 400ml water
1. Start by sterilising the jars and their lids in the oven for 15 minutes at 140C/275F/gas mark 1.
2. Very thinly slice the onions.
3. Melt the butter in a large, heavy-based saucepan over a medium heat. Tip in the onions and stir to coat in butter. Cook gently for 7-10 minutes.
4. Sprinkle over the sugar, and mix in. Cook uncovered for 30-40 minutes, stirring occasionally, until the onions are very soft and sticky.
5. Pour in the wine, water, vinegar, garlic and thyme and simmer over high heat for 20-25 minutes, stirring every so often to ensure the mixture doesn’t burn.
6. Cook until the liquid has reduced by about two-thirds.
7. The marmalade is ready when you can draw a wooden spoon across the base of the pan so that it leaves a channel behind it that does not immediately fill with liquid. If not, bring to a rolling, boil for a further 5 minutes, or until thick.
8. Scoop into sterilised jars and seal.
9. Keep refrigerated for up to 3 months unopened. Once opened use within 2 weeks.
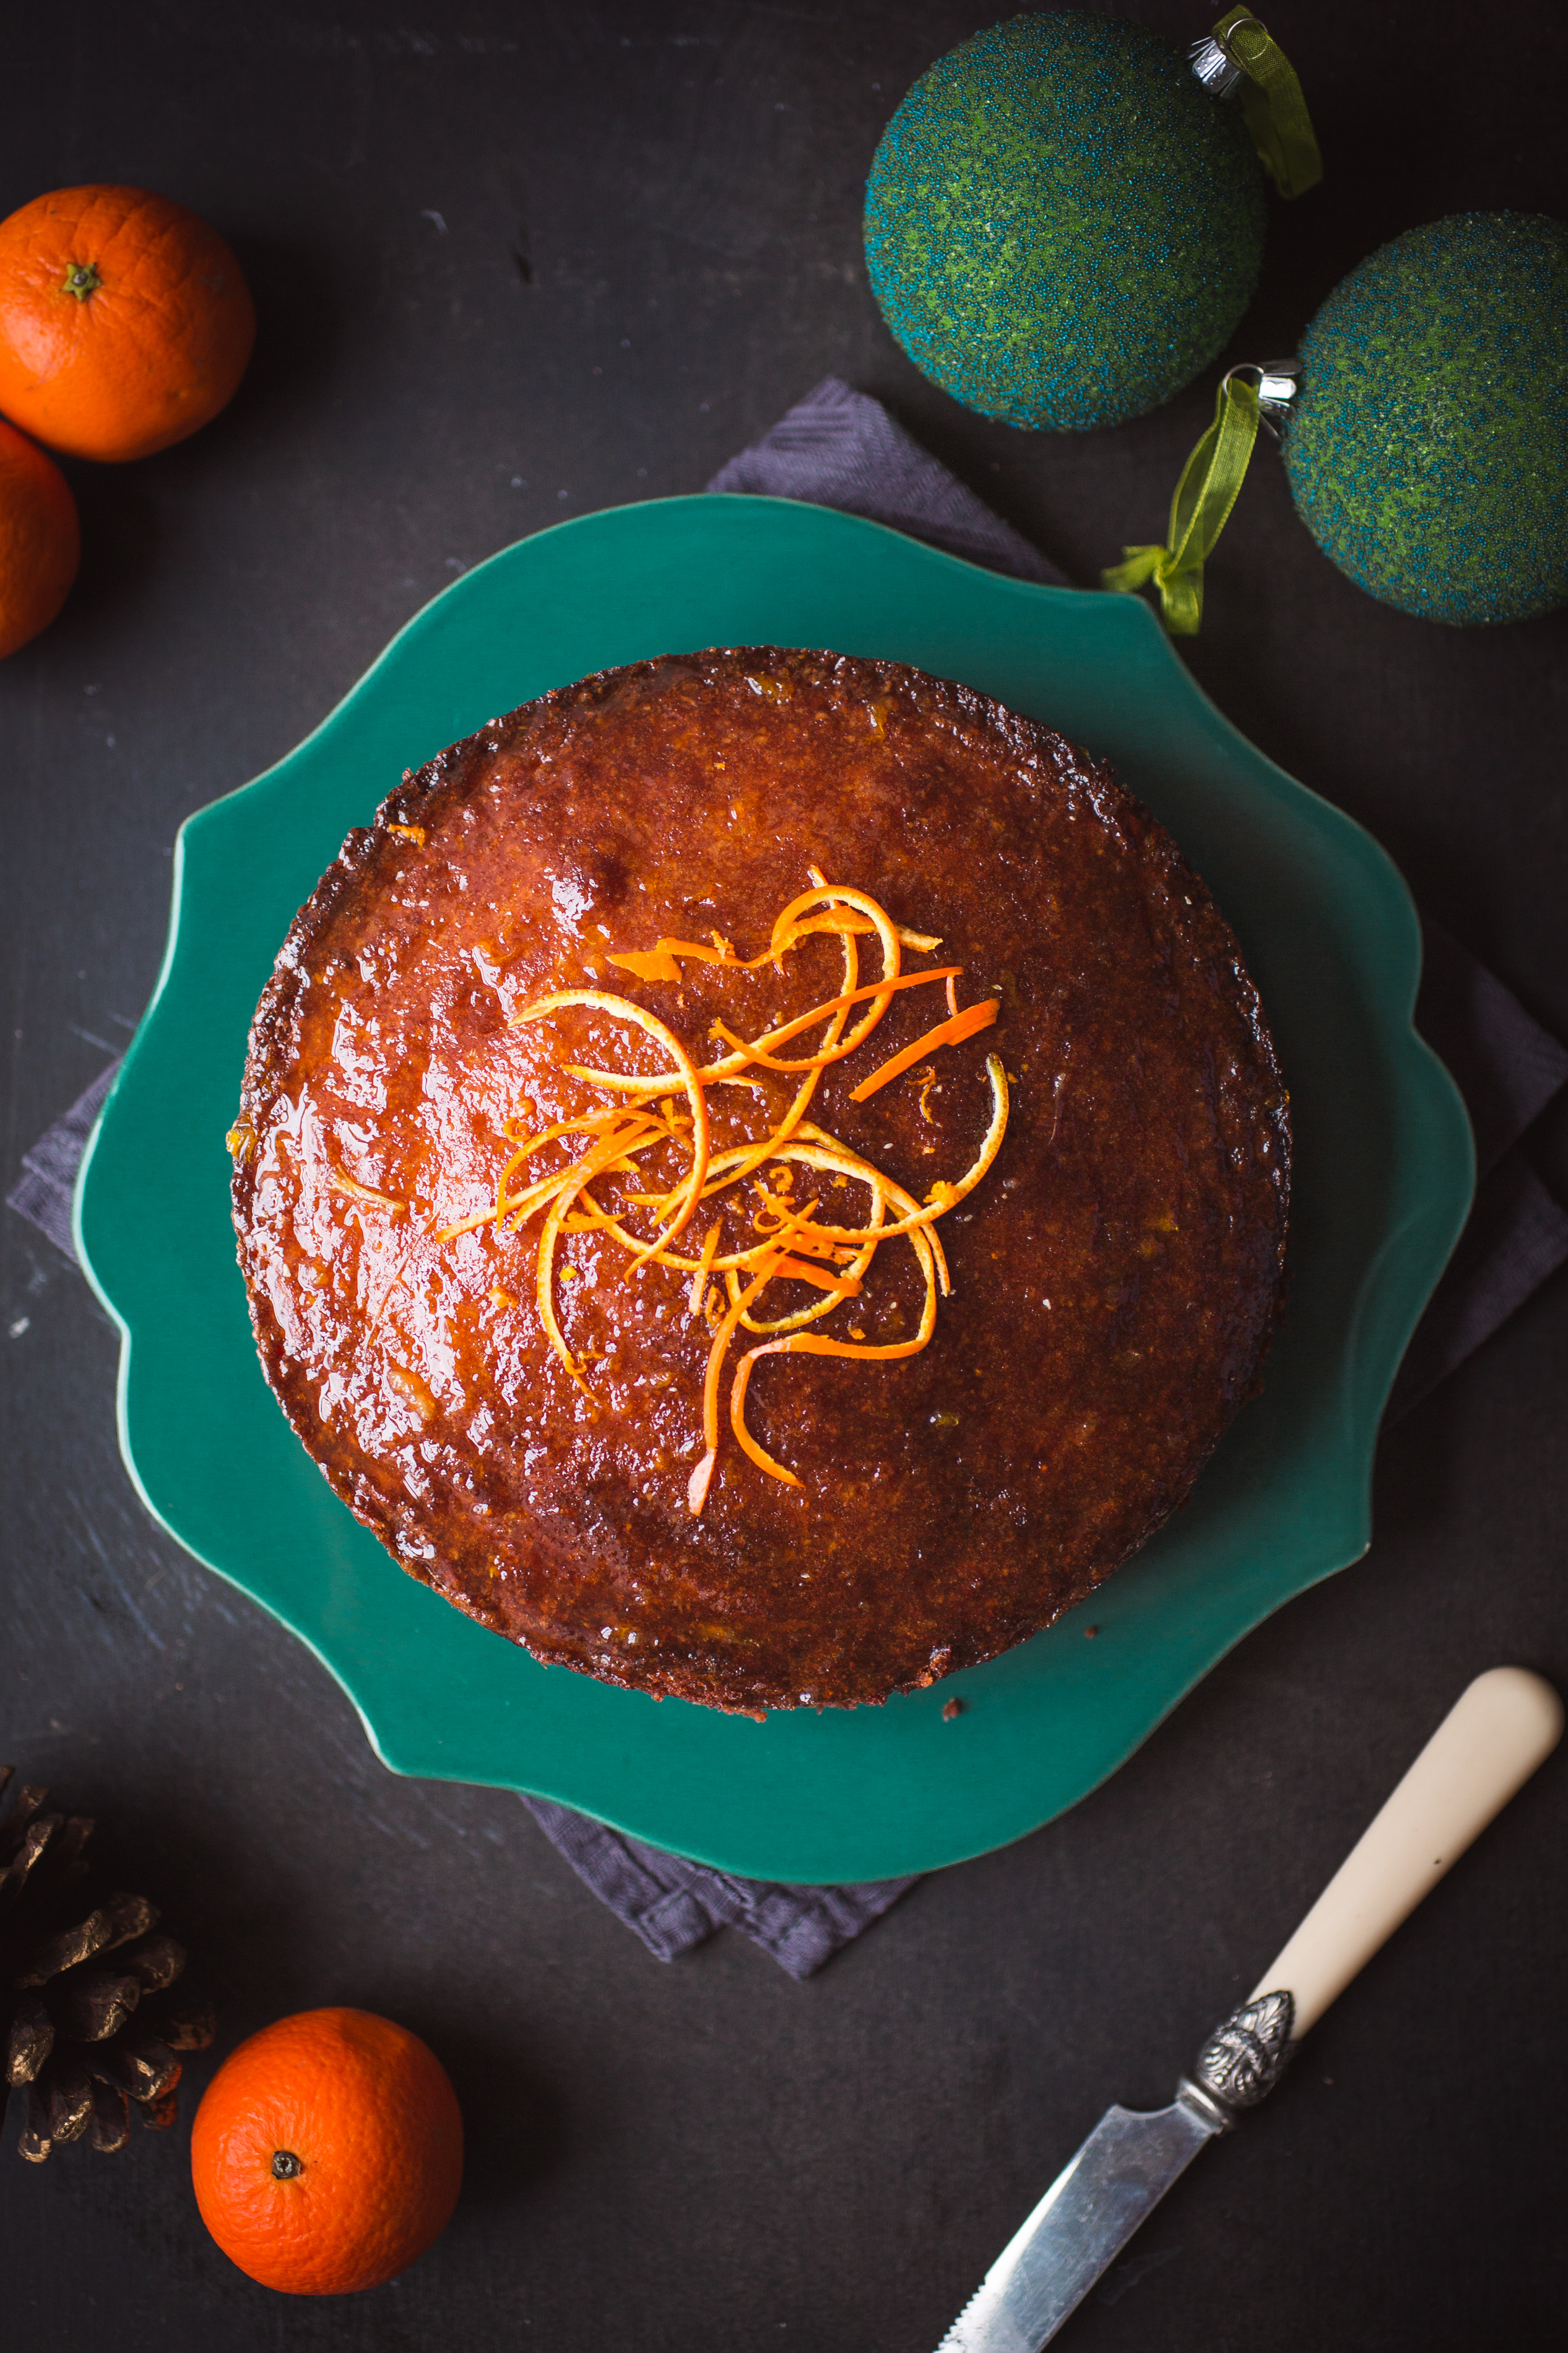
Wherever you call home, you don’t have to stick to the traditional Christmas pudding or desserts, you can branch out! How about bringing a little Spanish flair to your Christmas table this year with my vibrant Orange and Almond Cake.
Its delightful sticky and syrupy texture means a little goes a long way…but you will return for more, I can guarantee it!
Orange and Almond Cake
Making this cake will fill your kitchen with the fragrant scent of oranges and sweet almonds. It always puts me in a good mood whilst baking this glistening and sweet cake.
Orange and Almond Cake
Serves 8
200g/7oz butter
380g/13oz caster sugar
2 oranges, zest and juice of
280g/10oz ground almonds
5 medium organic eggs
100g/3.5oz plain flour, sifted
long strips of orange zest to garnish (use the zest from the syrup oranges)
For the syrup
2 oranges, juice of
80g/3oz caster sugar
1. Preheat oven to 170ºC/fan 160ºC/Gas 5 and grease and lightly flour a 24cm spring form cake tin.
2. Beat the butter, caster sugar and zest in a mixer on a low speed until well combined. Add half of the ground almonds and mix through.
3. With the mixer still running, add in the eggs one at a time, stopping every now and then to scrape the sides and bottom of the bowl.
4. Add in the remaining ground almonds and sifted flour, then mix briefly until smooth. Spread the mixture into the cake tin and bake for 40-50 minutes or until a skewer inserted comes out clean. Remove from the oven and leave in tin to cool.
5. Meanwhile place the syrup ingredients in a small pan and bring to the boil, then reduce the heat and allow the mixture to reduce and thicken, approx. 10 minutes.
6. Whilst the cake is still a little warm, brush the top of the cake with the hot syrup.
7. Leave the cake to cool completely in the tin before removing it. Then garnish with the strips of zest.
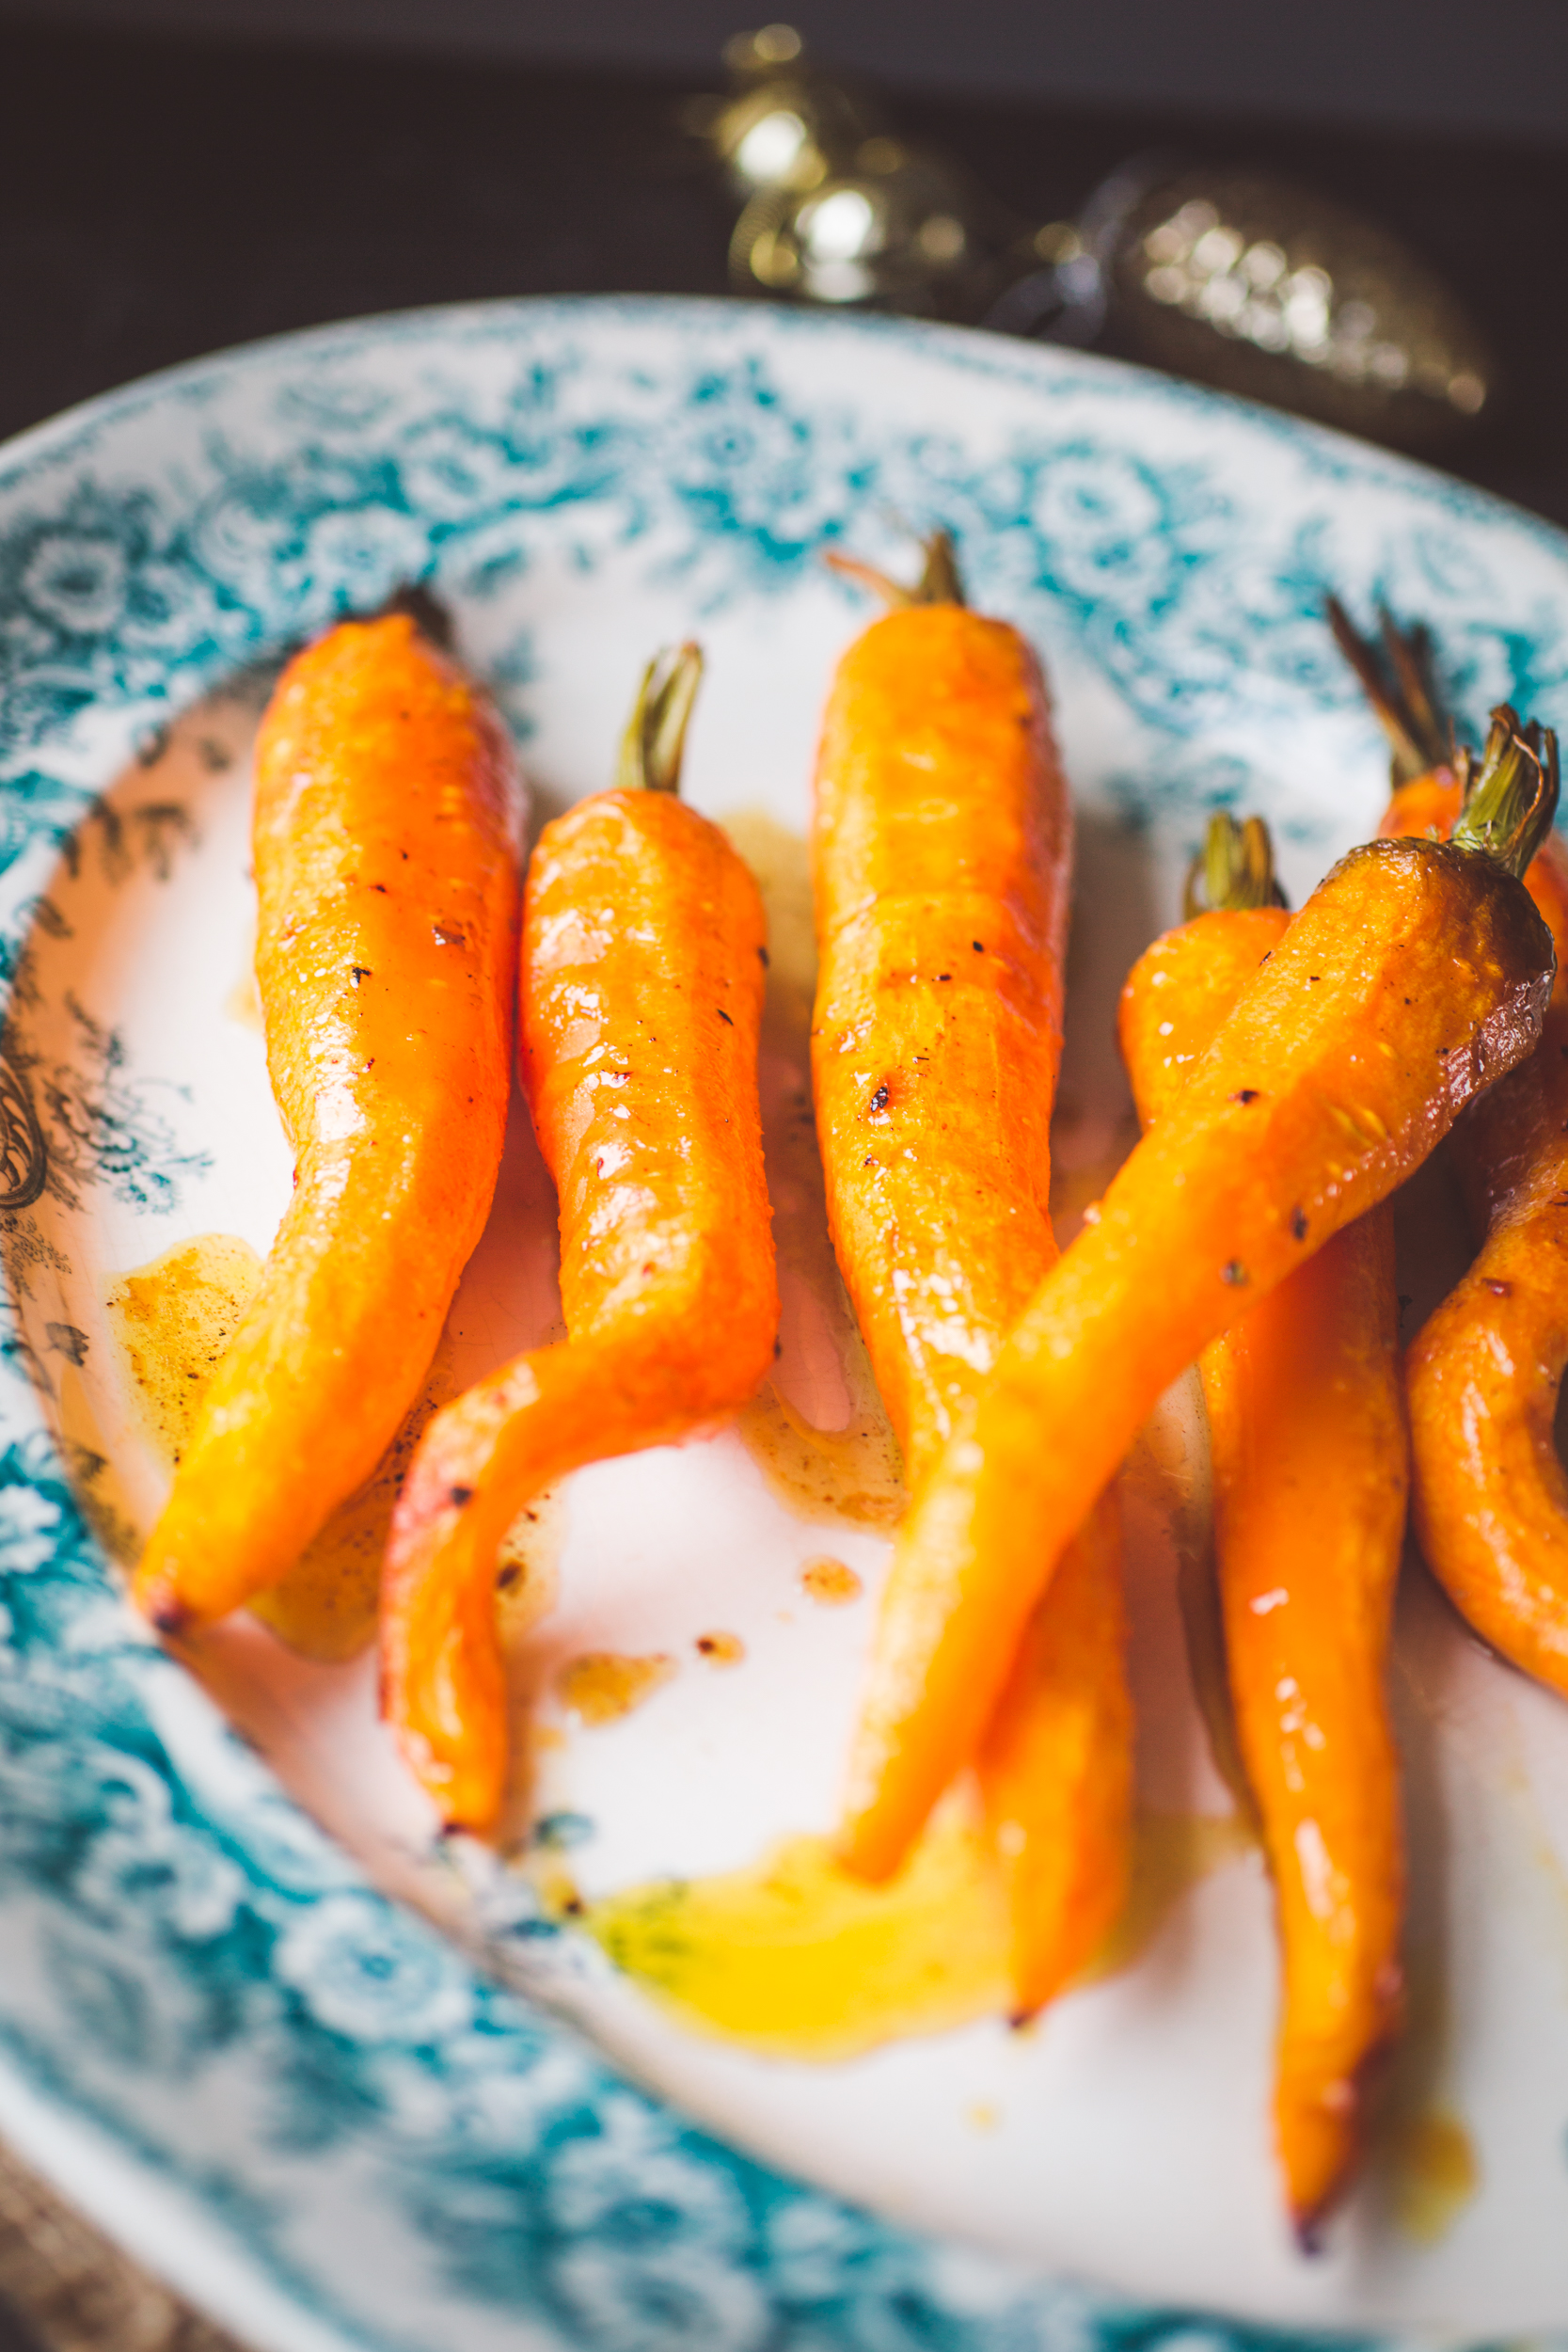
As we are getting closer to Christmas, I thought I would share another great recipe for you to adorn your winter table with i.e.. Roasted carrots done in beer and honey!
The carrots go really tender using this roasting method. And the sweetness of the root vegetable is really enhanced. They are buttery, slightly beery and very delicious!
Beer Roasted Carrots
We still have carrots in the garden, and you can tell these are homegrown by the little kinks and bends, which I find cute, rather than off putting.
They won’t be growing anymore in the cold earth, but they are safe to stay in the ground and overwinter, unless we get a very hard bout of frost.
I like to leave a little top on my carrots, its purely aesthetic, but it does look good!
Beer and Honey Glazed Carrots
Serves 4
500g/17oz carrots with tops
1 tbsp extra virgin olive oil
3 tbsp butter
4 sprigs thyme
70ml/2.4 fl oz beer
3 tbsp honey
salt and freshly ground black pepper
1. Preheat the oven to 220C/fan 200 /gas mark 6.
2. Chop off the leafy carrot tops and scrub well, paying attention to the tops, so you remove any dirt and sand.
3. Toss the carrots in the olive oil, salt and freshly ground black pepper. Place the carrots on a rimmed baking tray together with the sprigs of fresh thyme and knobs of butter. Bake for 15 minutes.
4. Meanwhile prepare the glaze by mixing the beer with the honey.
5. Remove the carrots from the oven and drizzle on the glaze. Toss to coat and place the carrots back into the oven for 10-12 more minutes.


 Serves 4